"Specialist Qualification in Handicrafts". Little I knew, when decided to start this education in August, 2013. After almost a decade of work I felt it'd be about time to find new perspectives. So easily we all stick to old routines, not just in work but in everyday life too. These 1,5 years have been a big dipper - sometimes I've felt extremely excited about all the new ideas and ways I could develop both my personal work and routines as well as our company. And then there has been days I've been exhausted and wondered why I even started the whole thing.
This examination is not only about creating handicrafts. About 2/3 of it is about brand, productisation, project management and so on (more info can be found here). The last part is about creating the masterwork - starting from the design and prototypes and ending up with the final piece with the whole project documented.
Since I've always been very fond of house decorating and lately very interested about interior design, especially the many possibilities of lighting, my final work ended up to be a chandelier type of a lamp. In the beginning of process there were several ideas, which varied in shape, material and setting, but my love for Arts & Crafts style won. Of course even the final piece changed some during the process (I have tendency to that!). It has some very characteristic features of my handprint along with nice technical details (of which I give glory to Mikko, who has eye for that kind of things). The final piece is a song of praise to crafts, metal and beauty in everyday life.
The whole process is not documented here, since it was hundreds of hours of work from first draft to last polish, but roughly it went like this:
Prototype
 |
| Cardboard model. Paper models. Inspirational pictures. |
First I went through several design, art and blacksmithing books and draw drafts. It's surprisingly time-consuming and, got to confess, not something I usually spend much time with. In most cases I have a rough idea of product in my head and the rest I design on the way, but this time I stuck with pen and paper for days. Mikko reminded me that well planned is half done. I said well planned is boring since there will be no surprises in the process, but (crumbling and muttering) made my way through drafting and planning.
 |
| Drafts and measuring. Material ja riveting tests. "I'll sleep over it." The funniest part of drafting was making the cardboard prototype. I used cardboard (leftover pieces of renovation project) for circles and old newspapers for lamps. And duct tape, of course. Then I attached thin wires to both circles and lamps to be able to mould them and to keep them in shape later. With cardboard prototype, proportions were much easier to outline. I made several tests for different size of lamps and changed the measurements of circles, finding the optimal size for aesthetics and function. |
 |
| Finishing circles. Circles and lamps, unfinished. Attaching clamps. |
We go often skipping to metal garbage bin of big metal workshop close to our house. This company is making, for example, huge autoclaves, so the pieces they throw away as too small to be reused, are big for our average works. When this project was about to start, I kept eyes open for materials fitting for my project and was really happy to find a lot of usable pieces. For both prototype and final work, a big amount of material was found this way. This explains some unconventional measures of materials, since they're not standard pieces from hardware shop, but cut from plate.
Colortech, this company with garbage bins of endless amounts of treasure, also has a versatile amount of massive tools for everything you've ever dreamed to do with metal. Mikko S., who is working there, has few times saved our time and backbone by cutting or bending bigger materials for some orders. I asked if he could make the circles for chandelier with a roller and he did. Even the bigger material, which looks really sturdy inside the house in finished piece, look like ridiculously tiny in that big roller!
 |
| Clamps and circles. Testing with electric wire and chain. Starting to take shape. |
As a sidenote: of course I could have bent them myself at workshop. And could even have made it hot. Problem with longer pieces like these is the setting of forge. It's in the corner and against the wall, so any bigger piece you want to heat up, it's a moment of circus movements and always some cursing. But it's doable. Nothing wrong with circus movements and cursing.
So I had circles, easily from the roller. Next part was to forge clamps for chains. Both circles have 3 clamps with hot punched holes on both ends and in upper circle, 3 smaller clamps with hole only on one end.
I used ready made chain. Chain gave quite a rough look to this prototype, since there was no decoration and just a little change of shape. I wanted chain to be big enough for wire to go through chain loops. After poking piece of electric wire through loops at workshop I noticed, that in most chandeliers or lamps with chain hanging, electric wire just hangs loosely somewhere around. I was shocked. Why it has be just hanging there like that, when it could be thread neat and nice through loops?! Then again, I had never noticed such a detail before. It's interesting how you start to see things when paying attention to some specific thing or detail.
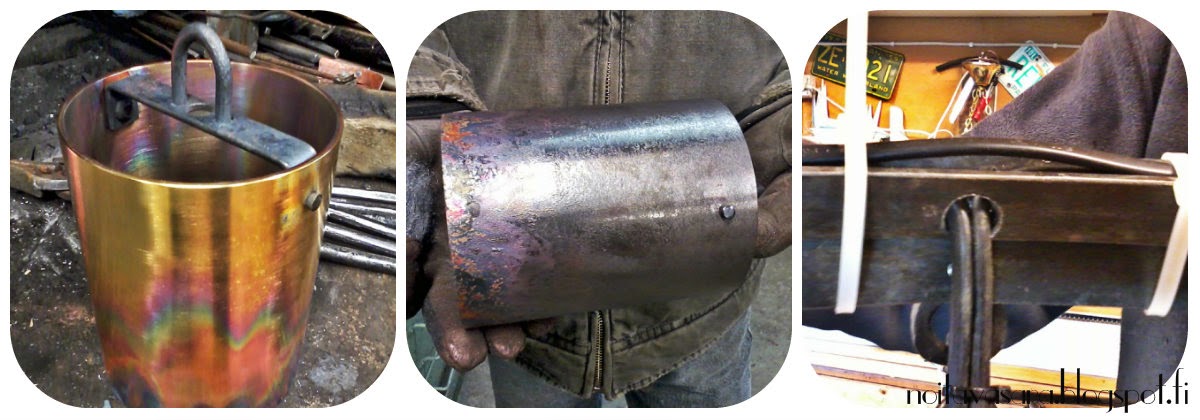 |
| Lamps, testing surface. Second testing surface: oxidized. Electric wires in place. |
Circles were ready with clamps attached and chains in places. It started to finally look like a chandelier. Next test piece were the lamps. I wanted to use copper for two reasons: a) the reddish colour of copper to give some warmth and b) combining two different materials - both metal, but very different to work with. I used copper pipe, 2mm thick, 85mm diameter. Lamps were 140mm tall, so even though one piece didn't weigh much, 6 of those added to all iron there already is made the chandelier rather heavy. But I wanted it to be heavy, if nothing else than just to stand out in this age of plastic.
When heated up, copper gets amazing colours. Funny thing with those is that you cannot control them in any way. After making some heating tests with small extra pieces of copper and comparing the surface, I ended up to oxidize it. Heating colours looked somehow too wild and unsettled. Oxidizing gave more even and harmonic look. All lamps were polished both from inside and out. Outside was left more dim, while inside was polished shiny to give more light.
When heated up, copper gets amazing colours. Funny thing with those is that you cannot control them in any way. After making some heating tests with small extra pieces of copper and comparing the surface, I ended up to oxidize it. Heating colours looked somehow too wild and unsettled. Oxidizing gave more even and harmonic look. All lamps were polished both from inside and out. Outside was left more dim, while inside was polished shiny to give more light.
 |
| 3 lamps missing. All lamps in place. Protype ready and packed. |
After the lamps were attached, prototype was ready for electricity. I didn't want to start to make working on final piece before electrification was ready - just to hear and see the possible trouble spots.
In average works it's rare to make this kind of prototypes. I could imagine that it would occur in cases where one has to plan a product for mass production or a bigger series of one type of item. I wanted to make one here, mainly because knowing myself, I always want to change some details or add something or remove something - this happens with pretty much with every project I've made. First words after giving the last polish to the piece I look at it and say 'Next time...'
Final work
Not that I was unhappy with the prototype. Far from that. I liked it a lot. I even found home for it before it was finished. Or should I say, it found a home for itself, since I was not pushing it to go.
Prototype was more simple than the final piece. I wanted to add some decorative motifs. Also after looking at prototype with critical (left) eye, I also wanted to change the way chains came down. And because ceiling is high in our house, I wanted to give it a tall silhouette, fitting for rooms like our hall and living room. To whisper a little secret: I hope it will find a place there. So often the shoemaker's children go barefoot - it'd be fun to have one masterpiece at home instead of all those crappy prototypes and Monday pieces one ends to carry home.
 |
| Hot punching. Clamps. Rivets and clamp on circle. |
The beginning was pretty much the same as in prototype: forging, bending, cutting, finishing, punching, welding, more finishing, drilling, riveting. This phase went with comfortable routine. Clamps were not exactly the same as in prototype, since I changed the setting of chains.

When circles were ready and clamps attached, there was more forging and bending. Gutters for electric wire were rather technical, but from the earlier experience I knew what to change and what to keep. Also the electrification of prototype revealed some trouble spots which I knew to avoid this time (to avoid getting more cursing from my electricity man, Rami).
At the hindsight, this whole gutter could have been made differently. There could have been just small fasteners which could have been bent to hold the wire. Why it had to be complicated like this then? Purely aesthetical reasons: I wanted to hide the wire. From the average angle of sight it will now be invisible.
 |
| Decorative motifs, lamp hangers. |
Decorative motifs also have technical aspect. There's 3 sets of curving spirals on middle circle: 2 of the set, the side ones, are purely for decoration, but the middle one are also for hanging lamps. Electric wire hides here too; on backside of the big spiral is a gutter for it and it comes out and down from the end of spiral and from there to lamp.
At this point I felt like adding more and more decoration, but stayed firm. I wished to keep wholeness simple - still amused myself for some time by adding imaginative fantastic decorative details to it until I had to, metaphorically, kick myself back to the real world and leave pink glittery unicorns and crystals for those who like them. Keep it simple, keep it elegant.
 |
| Detail of lamp hanger, hidden welding. Testing the angles. Planning decorative motifs. After twisting and turning spirals, last step in iron parts was box for electric wires. Distributing had to be done and they never look nice, so they can be done and hide inside the box. It also adds one more circle to the whole, making it a group of three. Things look good in threes - two is nice and symmetric but three has some edge. Originally I designed chains going straight up to the ceiling from here, but... you'll see in the end how it went. |
 |
| Electric wires will be hidden inside this funny little box. It even has a lid to protect home flies not going adventure inside. |
For lamps I used brass instead of copper. Copper was nice to work with, but for me brass had more the feeling I wanted. Had some problems finding both of the materials. Copper pipes are rather pricey and the wider the diameter, the thicker it gets, which of course adds weight. Brass pipes were not found from my usually trustworthy dealer Helsingin Rauta. They of course were very helpful and even found out some prices from their supplier in Germany, but it'd have been way too expensive. Also they only delivered 6 meter long pipes and I only needed bit over one meter.
Then one day Mikko and me went to get some other materials from our other trusted dealer, Nakolinnan Rauta. And there, just on top of a pile of mixed bits and pieces, was laying a perfectly shaped and sized brass pipe. I didn't take my eyes off it for the whole time we spent there, honest. It didn't even cost much since it was just indefinite shortish piece. Happily, I took it to workshop.
Then one day Mikko and me went to get some other materials from our other trusted dealer, Nakolinnan Rauta. And there, just on top of a pile of mixed bits and pieces, was laying a perfectly shaped and sized brass pipe. I didn't take my eyes off it for the whole time we spent there, honest. It didn't even cost much since it was just indefinite shortish piece. Happily, I took it to workshop.
 |
| Polishing brass pipe. Not so shiny as copper ones from the inside. Lamps ready to be attached. |
Brass lamps got similar treating as copper ones in prototype: oxidizing and polishing. Outside polish was left a bit dim and uneven and inside was polished more clear, but still rather roughly. I like the way copper metals age - the patina it gets gives it character. Best examples of this can be seen in pieces which are being held or otherwise often used by hands, for example door handles. Lamps are rarely touched, but they too change slowly with time, ending up having lively surface with signs of use and time.
 |
| Chains. Detail of chain hook. Ready! |
When all lamps were in place, I started to re-think the chains. Three chains going all the way up to ceiling would have surely look nice, but would have needed three separate hooks or holders in ceiling. At this point I'm not entirely sure where this lamp will end, so decided to change the design (told you it's typical for me!). From electricity box, there's three short chains going to chain hook and from there, a bigger chain goes up. Chains are easy to remove and change, if it comes to that. By that it's also easy to adjust the length of hanging.
Any last words?
"Next time..."
Big thanks to Mikko for supporting me through this whole school project & for all those technical hints I didn't always accept so easily <3